|
Age Range: 7 to 12
Grade Range: 2 to 6
Skill Level: Moderate
Appropriate for These Special Events:
Every Day and Rainy Days
Supports Subject Area(s) of:
Science
Language Arts – e.g. step by step instructions
Mathematics - measuring
Visual Arts
Time Needed for Project:
1 hour plus drying time
Main Materials:
Elmer’s® Colored Glue Sticks
Elmer’s® Craft Bond Permanent Tape Runner
Elmer’s® Tri-Fold Display Board
Horizon Wiggle Eyes
Click the links below to download patterns for this project:
Pattern 1
Pattern 2
Pattern 3
Pattern 4
Pattern 5
Basic Materials:
Decorative papers – 12” x 12” - assorted colors
Cupcake liners – colors to match
Scissors
Blue cellophane paper
Instructions:
- Unroll cellophane paper on work surface. Place Tri Fold Board, white side down, in center of paper. Trim excess to about 4” around entire board. Fold over top edge of cellophane to back of board then tape in place to secure. Repeat step with bottom edge. Set board up and slightly bend in sides. While bent, fold paper to back and tape in place. Repeat with other side. If the board is covered while flat, the sides will not bend in – there needs to be some ease at the sides.
- Cover back of board. Measure and cut sections of decorative paper to fit on back and both sides. Cut narrower pieces with about a 1” overlap to cover remainder of each section. Apply a thin bead of Tacky Glue around edges on back of paper then press into place lining up edges. Glue larger sections first then add the smaller pieces lining up along top edges.
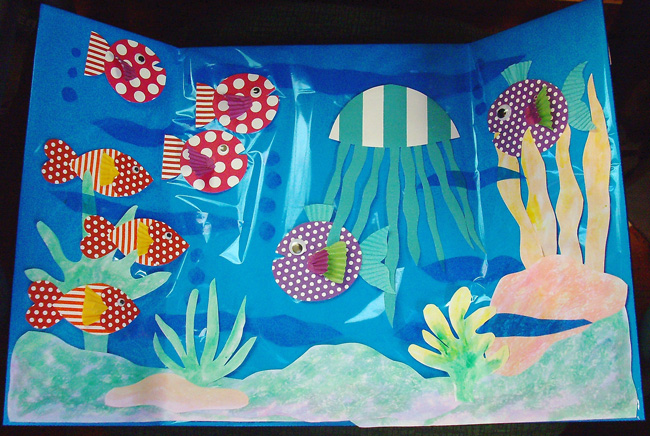
- Cut out fish designs from pattern sheet keeping pattern pieces for each fish together. Use a pencil to trace desired number of pieces onto back of decorative paper and cut out. To create fins, snip in on side of cupcake liner then cut off bottom section. Cut 1” sections from sides, angling sides. Use desired colors or refer to photo for colors and amount needed.
- Assemble fish – Red: For tail, add a dot of glue to front at tip of heart then place under pointed end of body. Add a thin line of glue to narrow edge on top of fin then press in place under top of other heart. Glue heart into place toward front end of body as shown. Glue small eye into place. Pink: Add glue to top at curved end on tail then press under body. Add a thin line of glue to back of fin then press in place slightly gathering paper. Glue medium eye in place. Purple: Place tail pattern onto liner paper matching curves and cut out. Glue on larger fin first then overlap with smaller. Glue on top fin and tail section where shown. Glue on large eye. Jellyfish: Cut freehand strips of paper for tentacles then glue in place equally spacing under curved edge.
- Use Colored Glue Stick to paint in remaining patterns pieces for ground, rocks and plants. Keeping pattern pages intact, rub glue into patterns going outside lines using a haphazard technique. Colors can be blended while still wet. Start with lighter colors working to darker for shading. Let dry. Cut out each pattern cutting off pattern line.
- To create depth, cut a few short uneven strips from blue cellophane then layer a few small pieces together and cut out small circles for bubbles.
- Position and layer everything in place weaving different pieces over and under as shown. Use Blue Ice Glue Stick to glue all cellophane pieces then use Tacky Glue to adhere remaining pieces in place.
|