|
Age Range: 7 to 12
Grade Range: 2 to 6
Skill Level: Moderate
Appropriate for These Special Events:
Every Day and Rainy Days
Supports Subject Area(s) of:
Language Arts – e.g. step by step instructions
Mathematics - measuring
Visual Arts
Time Needed for Project:
30 minutes
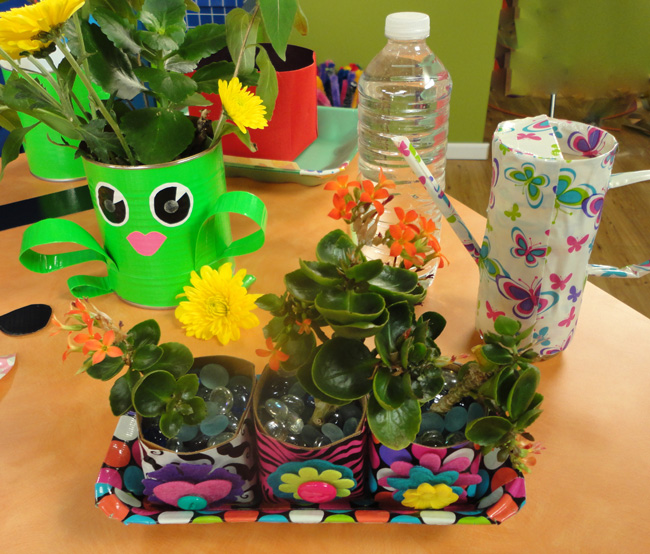
Interchangeable Frog Planter
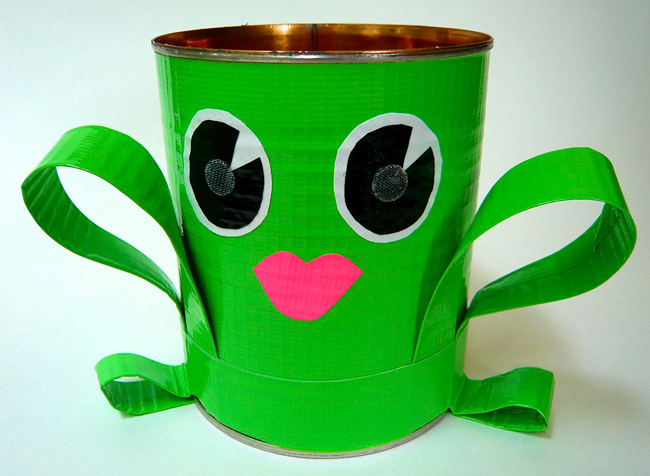
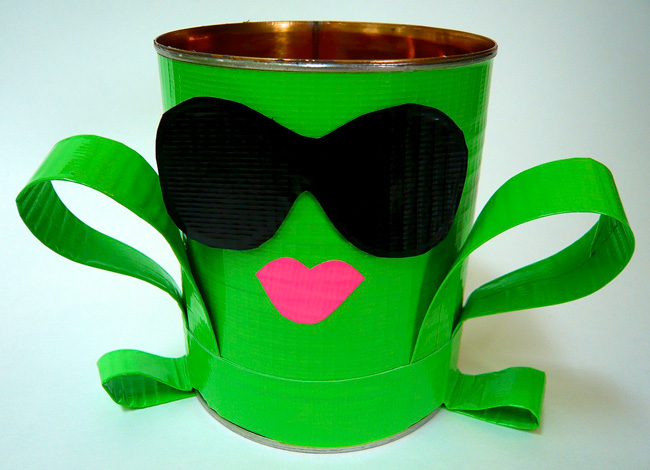
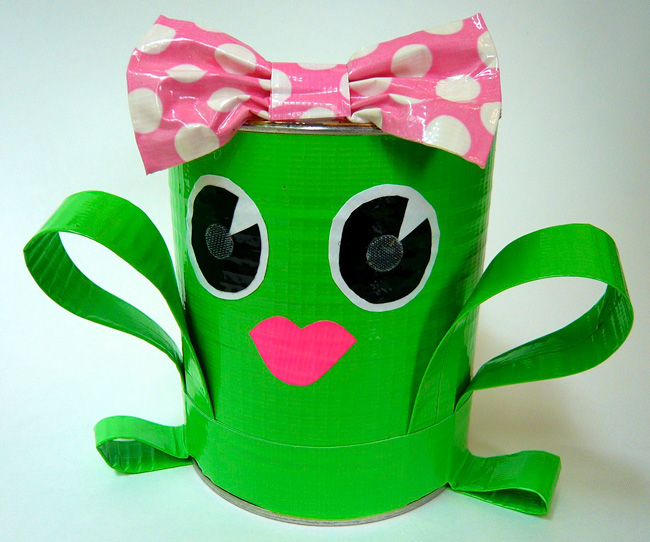
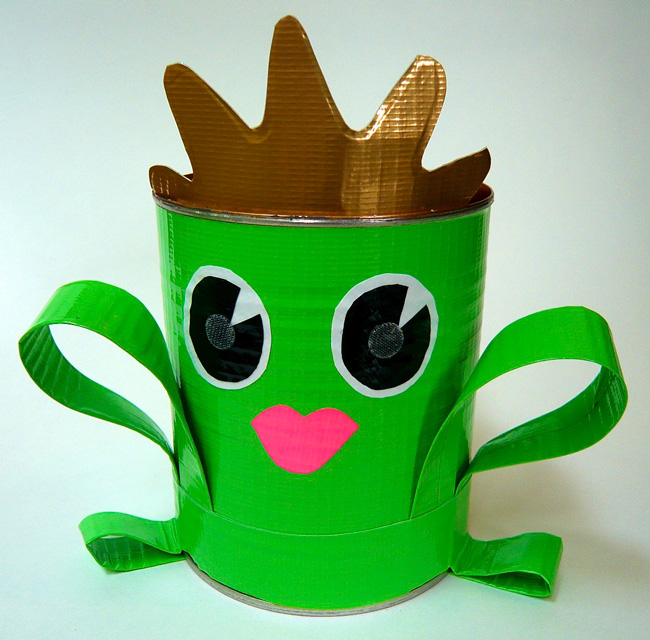
This cute little frog planter is made with one empty tin can and a lot of imagination! Customize this little guy or gal with detachable accessories such as sunglasses, a crown and a bow! The sky’s the limit when it comes to accessorizing this fun little frog!
Main Materials:
Westcott Brand® Kids NonStick 5” Blunt Tip Scissors with Microban® Protection (for ages 4 and up)
OR Westcott Brand® Kids NonStick 5” Pointed Tip Scissors with Microban® Protection (for ages 6 and up)
Westcott Brand® Pencil Sharpener
Westcott Brand® Eraser
Westcott Brand® Ruler
Westcott Brand® Soft Touch School Compass with Microban® Protection (optional)
Printed Duck® Brand Duct Tape
Color Duck® Brand Duct Tape
OR
Printed Duck® Brand Duct Tape Sheets
Color Duck® Brand Duct Tape Sheets
VELCRO® Brand Clear Hook and Loop Fastener Tape
3/8” VELCRO® Brand Clear Hook and Loop Fastener Coins
Basic Materials:
Pencil
Plain Cardstock
Empty Tin Can
Instructions:
- Cover the outside of an empty tin can with duct tape. I used green for this frog but feel free to make yours an exotic jungle frog in any color!
- To create the frog’s legs, take two long strips of duct tape and fold them onto themselves in thirds. Measure your can to determine the length of the leg and foot strips.
- Loop the leg pieces to form knees and feet and secure them to the can with duct tape.
- Create eyes for your frog using layered circles cut out of duct tape sheets. You may freehand the shapes for the eyes, or choose to use a compass to create precise circles. For this frog, I cut notches in the pupils so she would appear to be looking towards the side. Feel free to make the eye shapes in your desired style.
- Place adhesive 3/8” hook fastener coins in the center of each of the frog’s eyes.
- Draw with pencil on cardstock to create interchangeable accent pieces such as a crown, sunglasses and whatever accessories you dream up. Sandwich the accent pieces between layers of duct tape and trim along the edges leaving about a 1/8” border between the cardstock and the edge of the duct tape.
- Attach hook and loop fasteners to the accent pieces and along the interior of the front of the can or wherever your accent pieces will be attached. Handy Hint: Be sure to check to make sure that hook pieces and loop pieces are positioned correctly so that the pieces will properly adhere to each other.
- To create the bow, place two small strips of duct tape together (sticky sides together). Fold the piece into an accordion shape and secure it with a small strip of duct tape, leaving a strip of tape hanging. Place a piece of hook fastener to the hanging strip and use that to attach the removable bow to your frog.
- Place a handful of rocks in the bottom of the planter for drainage.
- You can either use the planter to display a leafy plant with flowers or if you are feeling really creative, you can plant grass seeds for “hair” that can be cut and styled!
Seed Starter Set
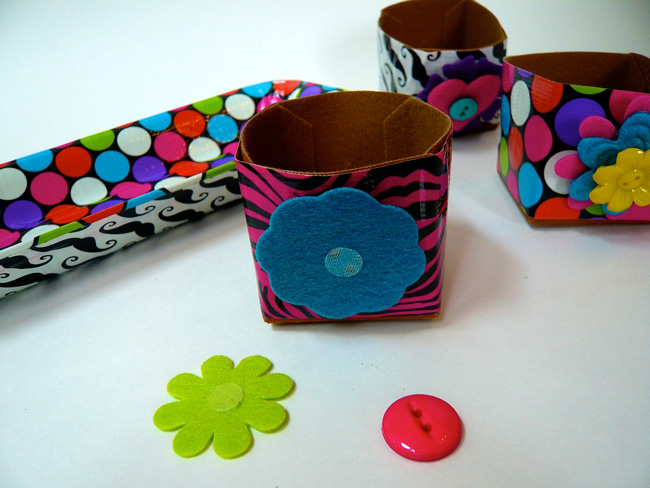
These convenient collapsible seed starters start out plain but can be easily decorated to suit your individual sense of style! To create a mini garden set, simply adorn a disposable foam produce tray for a beautiful base for your miniature flowerpots. You can further embellish your seedling pots by layering and rearranging colorful buttons on the fronts of the pots.
Main Materials:
Westcott Brand® Kids NonStick 5” Blunt Tip Scissors with Microban® Protection (for ages 4 and up)
OR Westcott Brand® Kids NonStick 5” Pointed Tip Scissors with Microban® Protection (for ages 6 and up)
Westcott Brand® Ruler
Printed Duck® Brand Duct Tape
3/8” VELCRO® Brand Clear Hook and Loop Fastener Coins
VELCRO® Brand Miniature Folding Seed Starter Pots
Basic Materials:
Colorful Buttons
Empty Foam Produce Tray
Instructions:
- Assemble the seed starter pots by folding the flaps around the edges and securing them with slight pressure.
- Cover the sides of the seed starter pots with strips of duct tape leaving the bottoms of the pots uncovered so water can flow through the drainage holes.
- Embellish the fronts of the pots by layering buttons of assorted sizes and colors. Connecting the buttons with the hook and loop fastener coins allows you to switch the buttons around to create a multitude of different embellishment effects.
- Find a foam food tray that would otherwise be thrown away and cover it in duct tape. Handy Hint: If you can’t find a tray like this, you can make one by cutting an empty cereal box. The tray will capture any water that flows through the drainage holes.
- Plant seeds in potting soil in the seedling pots and place them on top of the tray. Remember to give your plants water and sunlight. After watering be sure to pour out the excess water from the tray. The soil should remain moist but not too wet.
- Continue to grow your mini garden set until the plants outgrow the seedling pots. Then cut the tape and carefully unfold the pots to remove the plants. You can then plant them in larger pots or into your outdoor garden!
Duct Tape Watering Can
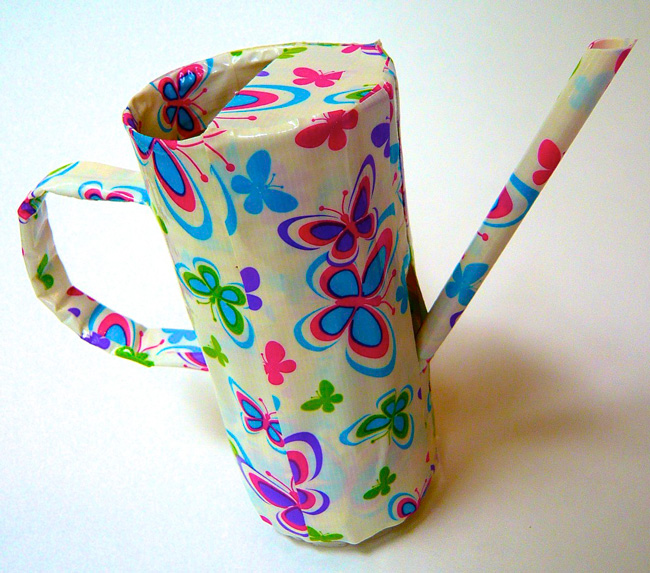
This quick and easy project makes fun use of an ordinary drinking straw and an empty water bottle by “upcycling” them into a customized watering can for your garden!
Main Materials:
Westcott Brand® Kids NonStick 5” Blunt Tip Scissors with Microban® Protection (for ages 4 and up)
OR Westcott Brand® Kids NonStick 5” Pointed Tip Scissors with Microban® Protection (for ages 6 and up)
Westcott Brand® Ruler
Printed Duck® Brand Duct Tape
OR
Color Duck® Brand Duct Tape
OR
Printed Duck® Brand Duct Tape Sheets
OR
Color Duck® Brand Duct Tape Sheets
Basic Materials:
Empty Plastic Water Bottle (lightweight plastic)
Plastic Drinking Straw
Instructions:
- With the help of an adult, cut off the top portion of a plastic water bottle.
- With the help of an adult, cut a small hole in the bottle near the bottom.
- Cover a plastic drinking straw with duct tape.
- Insert the end of the covered straw into the hole in the bottle at an angle.
- Secure the straw in place using duct tape. Be sure to use lots of tape to prevent leaking.
- Cover the remaining portion of the water bottle with duct tape. Be sure to cover ½ of the top opening with duct tape to prevent any spillage of water.
- Create a handle for your watering can by rolling a strip of duct tape several times and securing both ends to the side of the bottle with duct tape. Handy tip: Be sure to use your hand as a measuring guide for this step.
- Test the watering can by filling it with water to check for leaks. Note any leaks and after drying, reinforce any leaky areas with more duct tape.
- Use your stylish new watering can to keep your garden and potted plants hydrated and happy!
|