|
Hands on Crafts For Kids is the resource for kids craft projects and instructions for kids 6-12 and parents, teachers and other group leaders. It includes school and curriculum based projects, multi cultural projects, and every day, holiday and seasonal ideas. |
| 1613-4 | Print | Close [X] |
CLOTHES PIN PEOPLE Watch the video for this project online at: |
 |
Always cover your work surface with a mat or some type of protective covering like wax paper or plastic.
Age Range: 7 to 12
Grade Range: 2 to 6
Skill Level: Moderate
Appropriate for These Special Events:
Every Day and Rainy Days
Supports Subject Area(s) of:
Social Studies
Language Arts – e.g. step by step instructions
Visual Arts
Time needed for project:
1 hour plus drying time
Main Materials:
FloraCraft® StyroFoam™ Balls – 1”
FloraCraft® StyroFoam™ disc – 7”
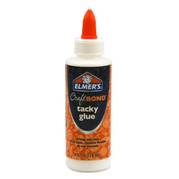
Elmer’s® Tacky Glue
Right click and choose "Save As" on the links below to download patterns for this project:
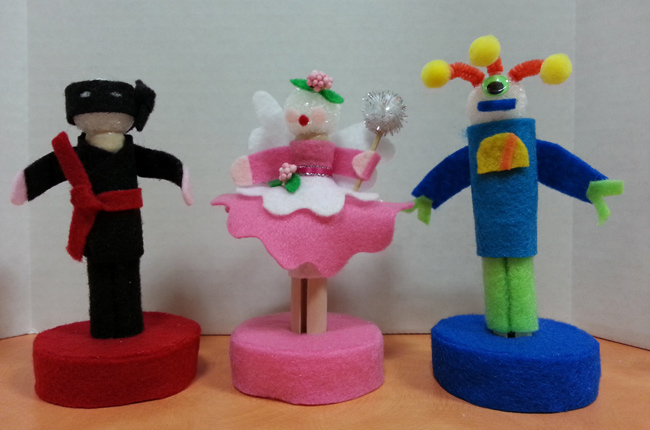
Pattern 1: Angel
Pattern 2: Robot
Pattern 3: Ninja
Basic Materials:
Round clothespins
Felt- pink, light pink, white, neon colors, black, red, yellow, orange
Scissors
Toothpick
Pom pom- ½” metallic, ¼” yellow (3)
Ribbon – 10” pink
Pipe cleaner – orange
Small silk flower
Wiggly eye- ¼” neon color
Sewing pins
Wire cutters
Instructions:
All designs
- Apply glue to rounded tip of clothespin then press ball into place. Let dry.
- To create base – use glass to cut 2” or so rounds from styro sheet. Press clothes pin halfway into center of disc, twist then remove. Apply glue to side with hole and smooth. Press onto felt. Cut a strip from felt, add glue to side of disc then press on strip lining up top edge. Smooth around then trim ends so they butt together. Trim excess from other side so it stands flat. Use sharp scissors to cut a slit in felt over center hole then cut a few more snips in felt from center to edges.
Fairy:
- Cut out pieces from pattern sheet. Pin onto color indicated on pattern and cut out number indicated.
- Apply glue to one side of white rectangle and wrap around center of clothespin. Glue darker pink rectangle in place as shown pressing felt close to clothespin. Apply a thin line of glue to one side on cut edge on large skirt, position in place then overlap and press in place. Repeat step with white skirt layer.
- Glue hands at ends of arms. Apply glue to center area or arms and press in place.
- Wrap ribbon around waist and tie bow in back, trimming ends. Glue wings in place.
- To create wand, cut tips from toothpicks. Add glue to one end and press into pom pom. Let dry then glue on hand, folding over using a straight pin to hold in place if needed till dry.
- Cut small snips from silk flowers. Glue leaves into place then add silk flowers.
- Glue into dark pink base.
Ninja:
- Pin pattern pieces onto felt then cut out number indicated from each color.
- Fold leg piece in half, insert into opening of clothespin, open pieces then glue to back forming legs.
- Glue coat in to place referring to photo for placement. Tie belt around waist.
- Glue hands at end of arms then glue arms in place.
- Glue mask in place. Cut a thin strip of black, tie a knot, trim ends then glue in place at side of head.
- Glue into red covered base.
Monster
- Pin and cut patterns from felt cut number indicated for each color.
- Glue felt in place for legs, then larger turquoise piece for body.
- Use wire cutters to cut short pieces from pipe cleaner. Glue pom poms to one end of each.
- Add a dot of glue to end of each antenna and press into head. Glue eye and mouth into place.
- Add details to body, hands to arms then glue all in place.
- Glue into turquoise base.
Our Partners:
|

E-mail questions about Hands On Crafts for Kids to info@craftsforkids.com |