www.craftsforkids.com

Hands on Crafts For Kids is the resource for kids craft projects and instructions for kids 6-12 and parents, teachers and other group leaders. It includes school and curriculum based projects,  multi cultural projects, and every day, holiday and seasonal ideas.

It is  the online home of the public television program Hands On Crafts for Kids.

1701-1 Print | Close [X]
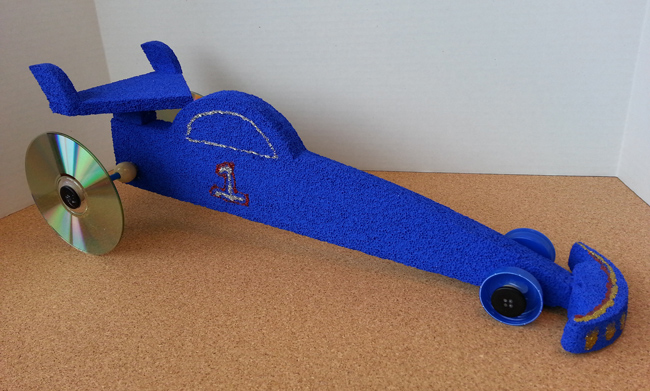
DIY Racecar


When you see the “helping hand” symbol on a project, it means you may need adult supervision to do the project.

Always cover your work surface with a mat or some type of protective covering like wax paper or plastic.

Age Range: 7 to 12

Grade Range: 2 to 6

Skill Level: Advanced

Appropriate for:
Every Day and Rainy Day Activities

Supports Subject Area(s) of:
Language Arts – e.g. step by step instructions
Mathematics - measuring
Visual Arts

Approximate time needed for project:
2 hours, plus time for glue and paints to dry

Click here to download patterns for this project in PDF format

Supplies:
FloraCraft® Foam:
Sheet: ½” x 12” x 36”
Make It: Fun® StyroCutter®
Elmer’s® Tacky Glue
Other Materials:
Acrylic Paint: Blue (or color of your choice)
12” Wood Dowel: 1/8”
(4) Recycled CD’s
(2) Recycled Plastic Bottle Caps
(4) Black Buttons: ¾”
Wood Beads: See Note Below*
*You will two larger wood beads that the straw will fit into (approx. ¾”). 
*You will need four smaller beads that the wood dowel will fit into (approx. ½”).
(2) Drinking Straws
Toothpicks
Double Sided Tape
(Optional) Fabric Paints and Glitter to Personalize Car
Tools:
Heavy Cardstock
Straight Pins
Pencil
Plastic knife
Hole-Punch or Metal Awl

DIRECTIONS:

  1. Enlarge templates to 150% and print out onto the cardstock. Cut out the paper templates and pin them to the foam sheets.
  2. Cut out the number of parts needed as directed on the templates using the Styrocutter or plastic knife. Rub pieces together to smooth. Glue the two bodies and two bumpers together.  Use a scrap piece of foam as a sanding block to “sand” edges smooth.  Paint all parts and let dry. Glue the bumper in place on the front of the car using toothpicks between the parts for added support.
  3. Assembling the back wheels: Use a pencil to pilot holes through the body (big enough for the straw).  Be sure the hole is level from side to side to keep the wheels level.   The back hole should be about 1” up from the bottom of the car and about 2” in from the back of the car.  Cut the straw to 5.5” long and glue it centered into the back hole.  Glue the two larger beads onto the straw and secured to the body of the car.  Cut a length of wood dowel to 6.5” long and insert it centered into the straw.  Glue a wood bead onto each end of the wood dowel; push it up to but not touching the straw.  Use the double stick tape to tape the two CD’s together with the shiny sides out. Repeat with the other two CD’s.  Glue the CD wheels onto the wood beads being sure the wheels are level and running parallel to each other.  Trim the end of the wood dowel if it sticks through the hole of the CD.  Glue a black button to the outside center of each CD.
  4. Assembling the front wheels:   Use the pencil to pilot the hole for the front axle.  The front pilot hole should be about 2” back from the front of the car and be about ¼” to ½” from the bottom of the car.  Cut the straw to about 1.5” long and glue it centered into the hole.  Cut a length of wood dowel to 3” and insert it into the straw.  Use the awl or hole punch to punch a hole in the center of each of the bottle caps. Place the bottle caps onto the ends of the wood dowel.  Glue a wood bead to each end of the wood dowel.  Glue a black button to each wood bead.
  5. Assembling the spoiler: Glue the two spoiler fins to the outside corners of the spoiler as shown.   Glue the two spoiler supports side by side and about ¼” in from the back edges of the spoiler.  Glue the bottom supports to the back end of the car with the front tip of the spoiler glued to the back of the car top as shown.  Use toothpicks for added support. 
  6. Add racing stripes or your favorite racers number to your car with fabric paints.


Our Partners:

www.makeitfuncrafts.com

www.elmers.com