www.craftsforkids.com

Hands on Crafts For Kids is the resource for kids craft projects and instructions for kids 6-12 and parents, teachers and other group leaders. It includes school and curriculum based projects,  multi cultural projects, and every day, holiday and seasonal ideas.

It is  the online home of the public television program Hands On Crafts for Kids.

1702-1 Print | Close [X]

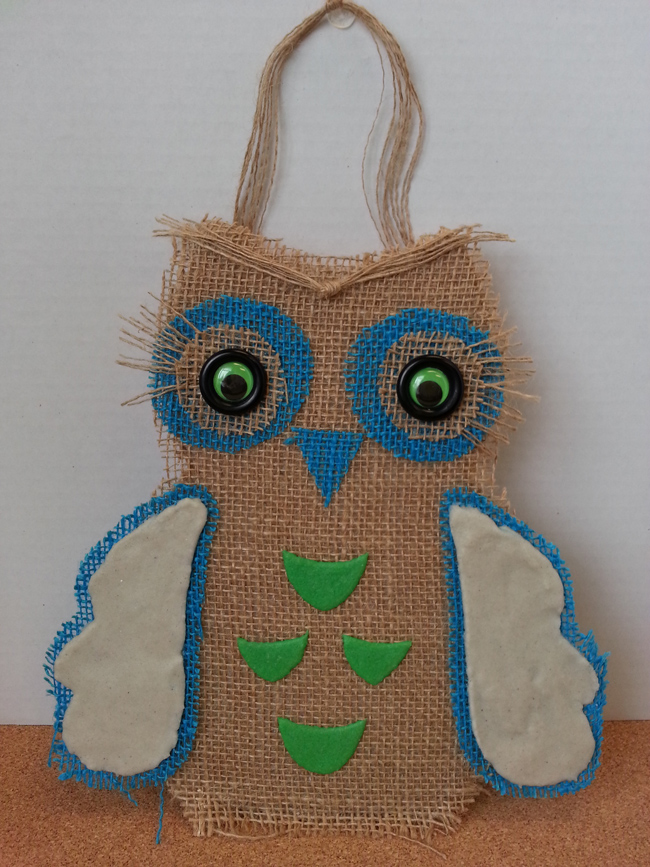
Burlap Owl


When you see the “helping hand” symbol on a project, it means you may need adult supervision to do the project.

Always cover your work surface with a mat or some type of protective covering like wax paper or plastic.


Age Range: 7 to 12

Grade Range: 2 to 6

Skill Level: Moderate to Advanced

Appropriate for:
Fall Holidays, Every Day and Rainy Day Activities

Supports Subject Area(s) of:
Language Arts – e.g. step by step instructions
Mathematics - measuring
Visual Arts

Time needed for project:
2 hours, plus drying time for glue


Burlap Owl

 by Cheryl Ball

Materials Needed:
FloraCraft®: Design It:® SimpleStyle® Natural Burlap roll
FloraCraft®: Design It:® SimpleStyle® Turquoise Burlap roll
ACTIVA® Scenic Sand™ – natural and green
Elmer’s® - Glue All
FloraCraft® Foam Sheet
The Kunin™ Group Classicfelt™  – tan
Serrated knife
Permanent felt pen
Scissors
Pencil
Cardboard covered with plastic wrap or a craft mat
Plastic tub
Plastic spoon
Wiggly eyes – (2) – ¾” neon green
Buttons – (2) 1 ¼” black
Self-adhesive shelf paper
Low tack masking tape
1 cup measuring cup
Plastic knife
Sewing pins

Patterns: (right click and choose "Save As" to download to your computer)
Pattern 1
Pattern 2
Pattern 3


Directions:

  1. Cut out pattern for owl body taping pieces together as instructed.   Trace onto foam sheet with felt pen.  Use serrated knife to cut out, sanding edges smooth with scrap of foam.
  2. Cut about five 1” strips from long side of tan felt sheet.   Working in sections, apply thin beads of glue to edge of owl.  Position strip into place pressing to secure.  Continue around entire shape butting ends where they meet.  Tip: Pins can be used to hold in place if needed till dry.
  3. Cut pieces of contact paper from roll.  Place, clear side up, over wing patterns then trace with felt pen.   To create stencil cut inside of design out leaving outer edge intact.    
  4. Cover cardboard with plastic wrap taping in back if needed.  Cut two lengths of turquoise burlap about 4” longer than pattern.  Place on plastic wrap then tape along sides to secure.  Carefully peel paper backing from stencil, center on burlap, press in place then run a fingernail along inside edges.
  5. Measure about 1 cup of white sand into plastic tub.  Squeeze in a puddle of glue then use spoon to mix.  Add more glue or sand as needed till the consistency of thick pancake batter.  Use knife to “frost” a layer of mixture over stencil.  Repeat with other wing.  Carefully pull off stencils straightening edges with knife if needed. Let dry then carefully peel from plastic.  Cut around sand leaving about a ½” border as shown.
  6. Cut two pieces of natural burlap larger than owl pattern.  Use felt pen to trace owl pattern onto one piece and cut out.  Squeeze glue onto one side of owl using finger to smooth to edges.  Position burlap into place then press to secure.  Let dry for a few minutes.
  7. To create depth, the owl has two layers of burlap on front.  Apply glue to owl then press on other sheet of burlap pressing to secure.   Let dry then flip over.  Use scissors to cut excess burlap leaving about a ½” border around entire shape.
  8. Use felt pen to trace center feathers on piece of shelf paper.  Cut out centers creating stencil.  Position in place where shown.  Mix Green sand and glue apply to stencil then remove and let dry.
  9. Details:  Pin large eye pattern to turquoise burlap and cut out two shapes then cut out beak.  Cut smaller eyes from natural.  Pull several strands from burlap and cut into 2” lengths.  Pull several more about 9” long and tie a knot in center.
  10. Position everything in place referring to photo for reference gluing wiggly eyes over buttons.
  11. To create hanger, pull several long pieces from burlap and tie a knot in center.  Glue ends to back of owl and let dry.  Small pieces of felt can be placed over ends to secure if needed.


Our Partners:


www.elmers.com
www.makeitfuncrafts.com
www.activaproducts.com