Age Range: 7 to 12
Grade Range: 2 to 6
Skill Level: Easy
Appropriate for:
Every Day and Rainy Day Activities, Parties
Supports Subject Area(s) of:
Language Arts – e.g. step by step instructions
Mathematics - measuring
Visual Arts
Time needed for project:
2 hours, plus drying time for glue
Indoor Hopscotch Play Mat
by Jodie Rackley
Materials Needed:
FloraCraft®: Design It:® SimpleStyle® Burlap Roll 18” wide
The Kunin™ Group Classicfelt™ - 10 Sheets + 1 Yellow, 1 Orange, 1 White
Elmer’s® Glue-All®
Scissors
Ribbon
Rice
Poly -Fil® Stuffing
Sewing Needle
Embroidery Floss
Wax Paper for under Work Surface
Marker
Pencil or Chop Stick
Pattern (Right click and choose "Save As" to download to your system")
To make the Hopscotch Mat:
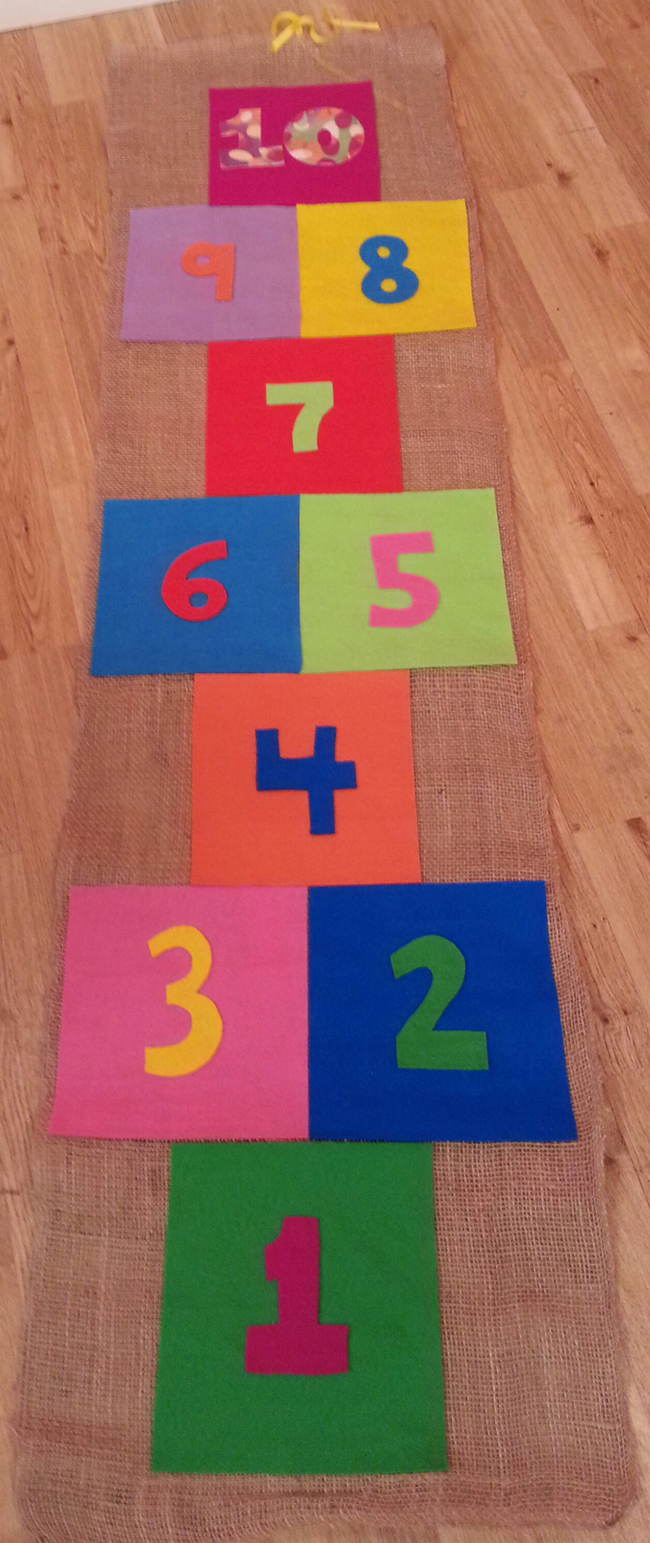
- Roll out the burlap roll so it is approximately 70 inches long.
- Next cut the top off of the felt sheets so they are about 8 inches long, cutting about 3 ½ inches off of the top so they have more of a square shape. Cut 10 pieces in 10 different colors
- Begin lining up the felt squares on top of the burlap beginning with one square in the center and then lining up two squares centered on top of that, alternating them by single and double squares until you get to 10.
- Now that we have our squares lined up, start with the first square and add glue to the back and glue it down in place on top of the burlap. Continue until all of the squares are glued in place. You may what to do this on a counter top or with wax paper or an old plastic table cloth underneath since some of the glue with go through the burlap.
- Using the remaining strips of felt from the squares, free hand cut the numbers from the felt strips. You can do this by drawing the numbers with a marker and then cutting them out or simply just going for it!
- Once you have all of your numbers 1 through 10, place glue on the back and place them on top of the felt squares until you have a number in every square.
- At the bottom of your mat, put a long piece of ribbon through the burlap, we’ll use it later to roll and tie up our mat. Poke it through with a pencil or chop stick.
- On the edge where you cut the burlap roll, glue all of the frayed edges to prevent them from fraying anymore.
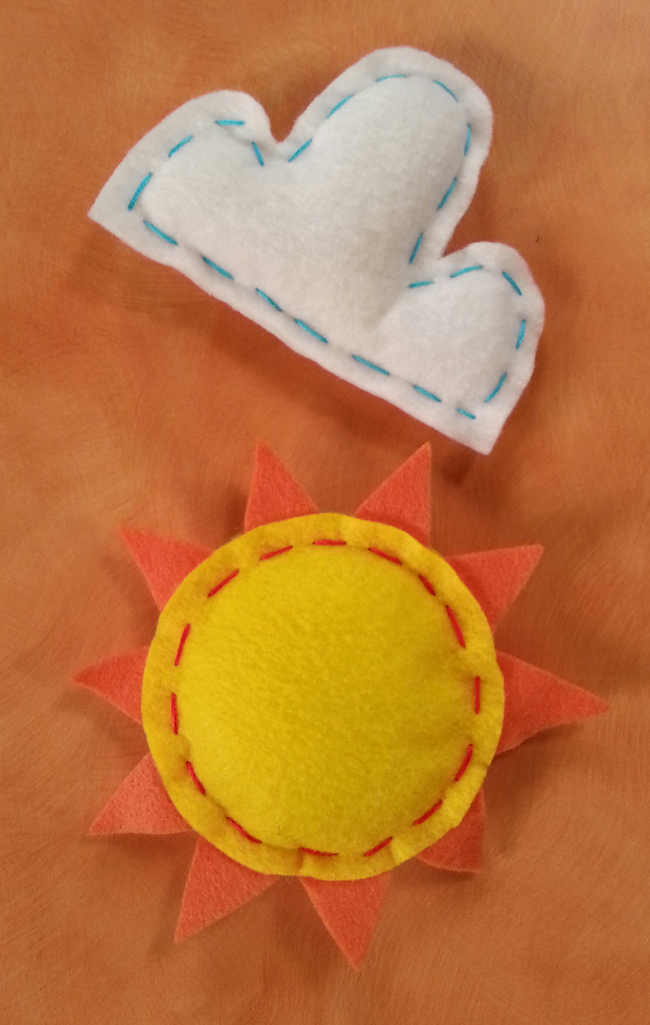
To make your Sun and Cloud shapes:
- Print and cut the templates out of paper. Pin the template directly to the felt and cut closely around the edge to make the shape or you can pin the template and draw onto the felt with marker and then cut out the shape. Cut 2 cloud shapes out of white felt. Cut 2 circles out of yellow felt and 1 orange sun shape.
- To make the cloud, layer the two felt shapes on top of each other and use a running stitch to sew around the outside edge with embroidery floss. Perform a running stitch by knotting one end of your thread and threading your needle – pull the thread all the way through both pieces of felt so your needle comes through the front, go back down through the top layer and pull your thread all the way through, come back up through to the top and continue. Sew almost all the way around the cloud shape, once you come close to finishing begin stuffing your shape with polyfil stuffing and rice to weight your shape. Once you are finished stuffing, sew your shape closed and knot and tie the thread on the back side.
- To make the sun shape, layer the circles on both sides of the spikey shape and make sure your circles line up, pin in place if you need to holding all the layers together. Begin sewing a running stitch around the outside edge of the circle, once you come close to finishing begin stuffing one side of your sun shape with polyfil and rice. When you are finished stuffing, sew your shape closed and knot and tie the thread on the reverse side.
For more information visit:
lovarevolutionary.blogspot.com
|