Hands on Crafts For Kids is the resource for kids craft projects and instructions for kids 6-12 and parents, teachers and other group leaders. It includes school and curriculum based projects, multi cultural projects, and every day, holiday and seasonal ideas.
It is the online home of the public television program Hands On Crafts for Kids.
When you see the “helping hand” symbol on a project, it means you may need adult supervision to do the project.
Always cover your work surface with a mat or some type of protective covering like wax paper or plastic.
Age Range: 7 to 12
Grade Range: 2 to 6
Skill Level: Advanced
Appropriate for:
Make Believe, Every Day and Rainy Day Activities
Supports Subject Area(s) of:
Language Arts – e.g. step by step instructions
Visual Arts
Time needed for project:
2 hours plus drying time for clay, paint and glue
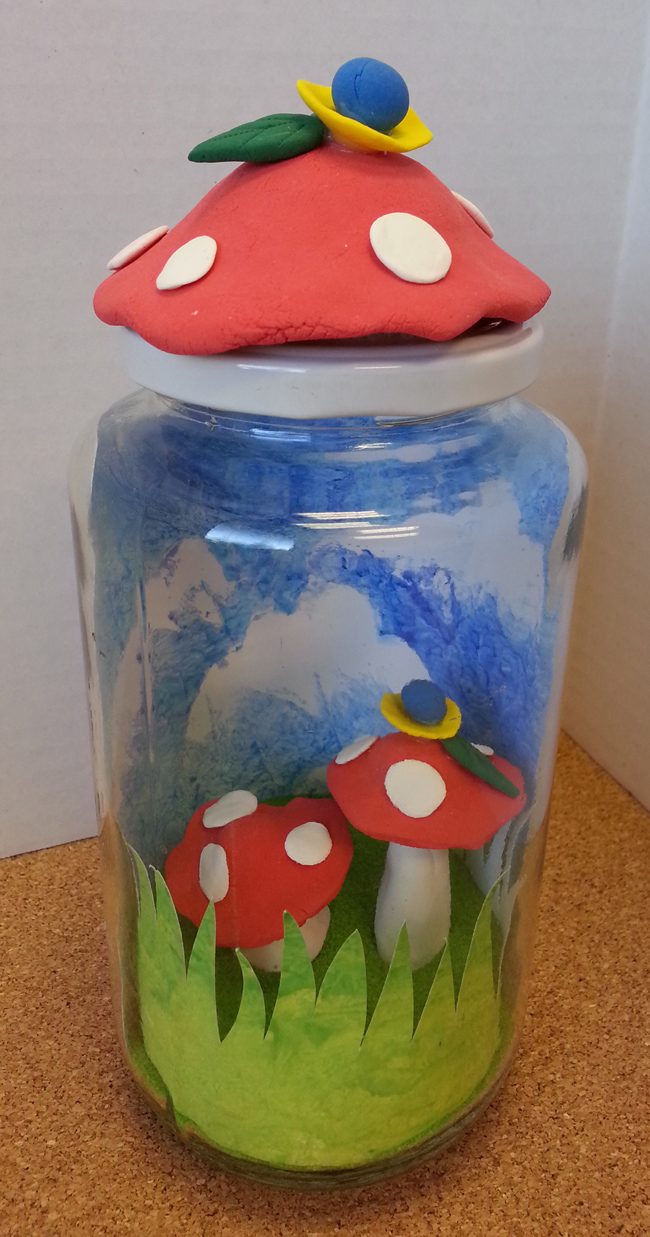
FAIRY GARDEN JAR
by Cheryl Ball
Materials Needed:
Sargent Art® - Sculpt-It!™
Sargent Art® - Tempera Paint – royal blue, turquoise, yellow, green
FloraCraft® Foam – 2” ball
ACTIVA® Scenic Sand™ – Green and/or any other color of your choosing
Elmer’s® Glue-All®
Tall jar – washed and dried
White cardstock
Wire cooling rack
Scissors
Pencil
Paper towels – cut into ¼’s
Serrated plastic knife
Foam plate
Ruler
Roller
Craft mat
Tongs - optional
Lid: Use serrated knife to cut foam ball in half and place on top of lid from jar. Pinch off a section of red clay. Form with fingers creating a thin round, pressing in center toward edges to form a cupped shape. More clay can be added or pinched off as needed to fit over foam ball and down sides of lid. The clay will shrink as it dries so make form slightly larger. Place clay over foam ball on lid and press to create mushroom shape as shown. Place on wire rack to dry.
Smaller mushrooms: Pinch a small piece of white clay then form into a 2” tall stem making base wider so it will stand then make another stem slightly shorter. Form caps of red clay same as lid using fingers to create dome in center as shown.
Flowers: Use yellow clay to create thin bowl shapes then make small balls from blue clay. Pinch a small amount of green, form into leaf shape then carefully press edge of serrated knife down center and diagonally for leaf pattern.
White dots: create thin small rounds from white clay.
Let everything dry. Once top of caps looks dry, flip over to speed drying of inside. Flip over lid cap and remove foam to speed drying.
Sky: Measure and cut a piece of white cardstock as tall and fits half way around jar, insert into jar and trim as needed slightly curving top corners. Cut out cloud pattern, trace on cardstock and cut out. Squeeze a puddle of blue and turquoise onto place. Crumple up paper towel and tap into turquoise. Holding cloud with one hand place about 1” from top edge then tap paint over top of cloud and up to edge. Tap same paper towel in blue then blend colors together. Move cloud to another place and repeat step. Add one more cloud as shown. Then fill in remainder of paper with blended paint.
Grass: Trace grass pattern onto cardstock and cut out. Squeeze yellow and green on plate. Use paper towel to blend yellow and green and blend to create a lime color. Pounce lime and green onto grass. Let dry.
Assembly: Glue mushroom caps to stems, half foam ball to lid then larger mushroom cap to foam. Glue blue centers on yellow flowers and white dots to caps. Let glue dry then glue flowers and leaves to caps as shown.
Insert sky and grass into jar, slightly curving paper for easy insertion. To create base for mushrooms, pour in about 3” of green sand. Use tongs to position mushrooms as shown. Screw on lid.