www.craftsforkids.com

Hands on Crafts For Kids is the resource for kids craft projects and instructions for kids 6-12 and parents, teachers and other group leaders. It includes school and curriculum based projects,  multi cultural projects, and every day, holiday and seasonal ideas.

It is  the online home of the public television program Hands On Crafts for Kids.

1808-1 Print | Close [X]

Accordion Journal


Watch the video for this project online at: https://youtu.be/D3tbpCC5Mgs


Host: Jenny Barnett Rohrs


Always cover your work surface with a mat or some type of protective covering like wax paper or plastic.
                                                    
Always use care when using tools or a heat source. Be careful and safe!

Age Range: 7 to 12

Grade Range: 2 to 6

Skill Level: Moderate

Appropriate for These Special Events:
Every Day and Rainy Days

Supports Subject Area(s) of:
Language Arts – e.g. step by step instructions
Mathematics – measuring

Time needed for project:
1½ hours plus drying time

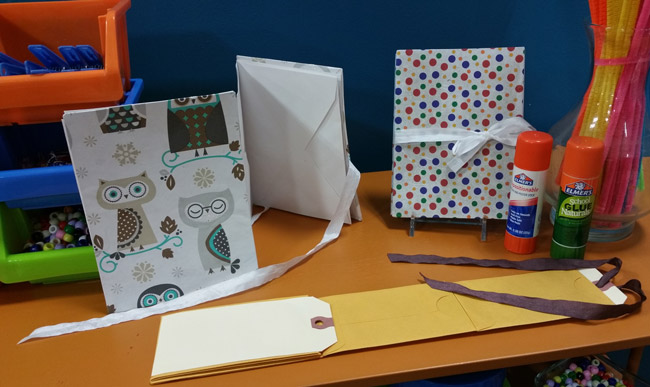
ACCORDION JOURNAL


Materials needed:

  1. Elmer’s® Disappearing Purple Glue Stick
  2. Cereal box cardboard
  3. Gift wrap
  4. Scraps of ribbon
  5. Envelopes (6 or another even number)
  6. Ruler
  7. Scissors
  8. Pencil
  9. Faber Castell® Connector Pens

Directions:

  1. Using an envelope as a guide, trace around using pencil on cereal box cardboard with pencil. Add 1/2 inch to the width and length. Cut out with scissors. Trace that rectangle to make a second cover. 
  2.  Using glue stick, glue a piece of wrapping paper to the covers. Let the sides of the paper hang over the edge. Using scissors, trim leaving approximately 1 inch all the way around.  Fold edges around the sides and glue onto the back. Fold corners in. Repeat for second cover. Let dry.
  3.  Open envelopes up so that the flaps are facing one direction and the “front” of the envelope is facing down. Place a little squiggle of glue on the flap. Place the bottom edge of another envelope OVER the flap, lining up with the fold line. Rub down with fingers. Continue until all of your envelopes are glued together in a line. Use an even number of envelopes. Let dry.
  4. Accordion fold the envelopes back and forth along the fold lines. (The open edges should be facing up.) Place the BACK of the TOP envelope against the BACK (folded edge side) of the cover. Adhere using the glue stick. Lay a 12” piece of ribbon horizontally in the middle of the back cover, right-side-DOWN.  (Folded edge should be facing up. Using glue stick, adhere the ribbon. Spread glue all over the folded side. Place the BACK of the last envelope down so that you have a cover on top and bottom, and the bottom cover has the ribbon. Place under a large book and let dry.
  5. Decorate with colored pens.

For more information visit www.CraftTestDummies.com

Our Partners:


www.elmers.com

www.fabercastell.com