www.craftsforkids.com

Hands on Crafts For Kids is the resource for kids craft projects and instructions for kids 6-12 and parents, teachers and other group leaders. It includes school and curriculum based projects,  multi cultural projects, and every day, holiday and seasonal ideas.

It is  the online home of the public television program Hands On Crafts for Kids.

1908-1 Print | Close [X]

ID BRACELET

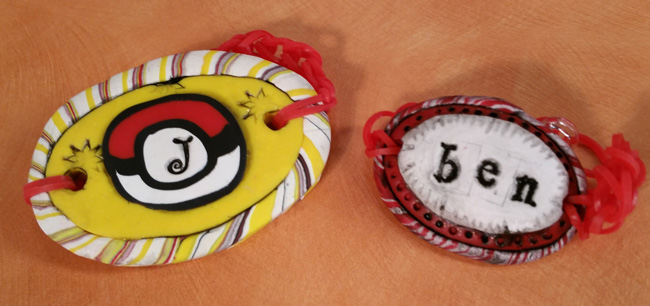
Jenny Barnett-Rohrs fashions a colorful ID bracelet from clay.


Hosts: Jenny Barnett-Rohrs

When you see the “helping hand” symbol on a project, it means you may need adult supervision to do the project.


Always cover your work surface with a mat or some type of protective covering like wax paper or plastic.
                                                    
Always use care when using tools or a heat source. Be careful and safe!

Age Range: 7 to 12

Grade Range: 2 to 6

Skill Level: Moderate

Appropriate for These Special Events:
Every Day, Gift Giving and Rainy Days

Supports Subject Areas of:
Language Arts – e.g. step by step instructions
Mathematics - measuring

Time needed for project:
1 hour plus baking and cooling

Polymer ID Bracelet

Materials:
Sculpey® polymer clay - 1 block each of red and white clay
Clay tools like a roller, bamboo skewer, toothpick
Cling film
Oval-shaped mini cutters
Small alphabet stamps
Black craft paint
Rubber loom bands and clasp
Crochet or loom hook if you have one.

Directions:

  1. Condition and roll out the white clay to the thickness of a nickel. Lay the cling wrap on top of the clay, and cut out a small oval shape.
  2. Condition and roll out the red clay to the thickness of a nickel. Fold in half so it’s twice as thick. Lay the cling wrap on top of the clay, and cut out a medium oval shape.
  3. Layer the small oval on TOP of the red oval. Place the cling wrap on top and of both and smooth lightly, making sure everything is attaching together with no air bubbles.
  4. Using leftover red and white clay, pinch 2 pieces about the size of a gumball. Roll each color into a long snake. Twist the snakes together and roll.
  5. Keep rolling and twisting until you get a cool pattern and the snake is about the size of a bamboo skewer.
  6. Wrap the twisted snake of clay around the large oval creating a border. Poke holes on either end to attach the band. Leave the space the width of a nickel from the ends.
  7. Using alphabet stamps, press in your name or initials. wavy w
  8. Curve gently if desired. Bake according to manufacturer’s directions. Let cool completely.
  9. Using the black paint, rub a little paint into the letters to help them stand out. Wipe off the extra with a damp paper towel or baby wipe. Let dry.
  10. Using a rubber loom loop, thread a loop through one hole in the polymer ID. One end should be on top, one on the bottom. Slide the loom hook through both loops; thread a new rubber loop through the two ends. Remove the hook and repeat as necessary to wrap around to the back of your wrist. Place a rubber loom clasp to hold.
  11. Repeat step on the other side to create a full band. Finish by using the loom clasp.

For more information visit: www.CraftTestDummies.com

Our Partners:


www.sculpey.com