Age Range: 7 to 12
Grade Range: 2 to 6
Skill Level: Advanced
Appropriate for These Special Events:
Every Day and Rainy Days
Supports Subject Areas of:
Social Studies
Language Arts – e.g. step by step instructions
Mathematics - measuring
Visual Arts
Time needed for project:
1 ½ hours plus drying time
Designed by Lisa Galvin
Materials:
Activa® Products, Inc.: Rigid Wrap™ plaster cloth, 4” x 100” length
Elmer’s® CraftBond® All Purpose Glue
Plaid® Enterprises, Inc.: Apple Barrel® paint colors: Burnt umber, Bonnet blue, Crisp green and Bright red
Recycled ½ gallon paper milk or beverage container, cleaned
Wooden dowel rods: One 3/8” x 3 ½”, one 5/8” x 12” piece
Pine cones: 2-3 medium, 2 small
Two small, flat sections of tree branch
5-8 popcorn seeds
Spanish moss
1 ¾” recycled condiment cup (or compass)
Chenille stem, 6mm x 8”, any color
Paper straw
Toothpick
Permanent marker
Disposable plastic bowl
Paper towel
Old coat hanger
Scissors
Wire cutters
Paintbrushes: small and medium
12” wooden kabob skewer
Pencil
Paper plate
Masking tape
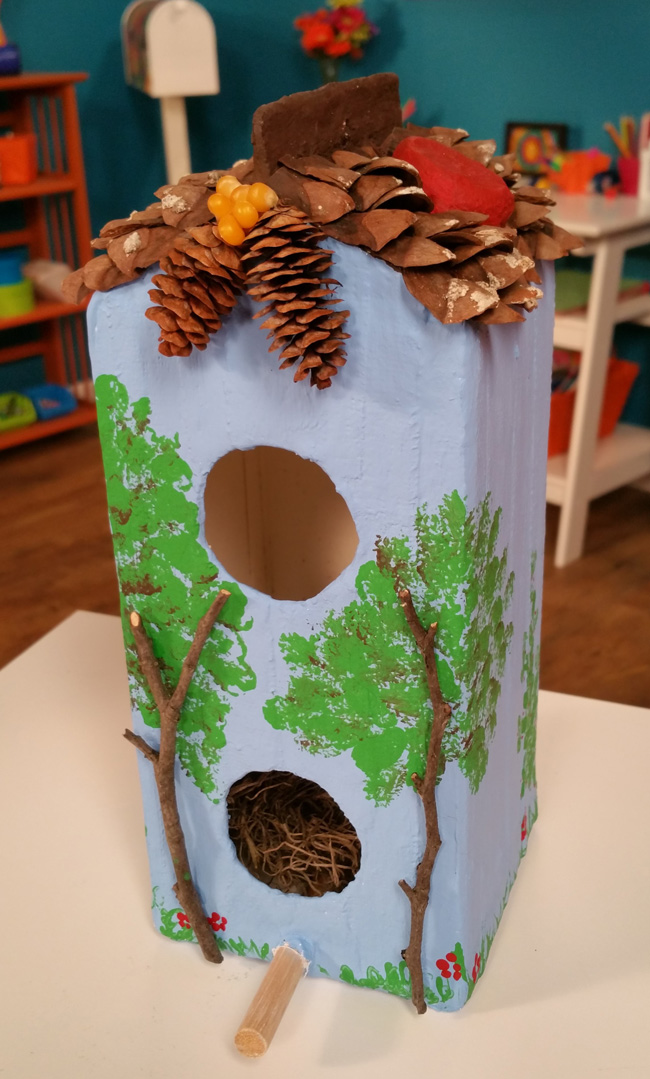
Use objects found in and around the home to decorate your own fairy garden birdhouse. Plaster cloth strips resemble wooden boards, giving this recycled carton a whole new look!
Directions:
1. Prep. Use marker and recycled condiment cup (or compass) to trace two 1 ¾” circles on front of milk carton. Punch a small hole at center of each circle using pencil tip then use scissors to cut out the holes along traced lines.
Use pencil to punch a hole near bottom of carton. Press pencil to sides of hole, enlarging big enough for 3/8” dowel to slide tightly through. Dowel should extend 1 ½” in front of carton. Wrap this portion of dowel only with masking tape to prevent it from getting plaster on it. Apply glue to inside bottom of cartoon beneath remaining dowel length. Press dowel into glue and let dry.
For hanger (adult assistance recommended), carefully use pencil tip to punch a small hole at top-center of milk carton. Cut an 8-10” section of coat hanger wire. Beginning near center, bend wire around the 5/8” dowel rod to make an “S” shaped hanger. Cut excess wire using wire cutters.
2. Plaster cloth. Plaster cloth is applied to carton one piece at a time, dipping a strip or section of the cloth into small bowl of warm water, then pressing it into place on the carton. Smooth surface with finger to distribute the plaster. Begin by cutting two 4” square pieces of the plaster cloth. Set one piece aside. Dampen the remaining 4” square briefly then apply to bottom of carton, wrapping edges onto sides of carton. Smooth with fingers.
3. Cut remaining plaster cloth into 10” lengths, then cut each length into four 1” x 10” strips. Cut, then dampen a 1” x 5” strip and wrap around plastic pour-spout lid (chimney) on top of cartoon. Repeat with the remaining 5” strip. Cover tab-like top of carton with one or two 10” strips of plaster cloth. Smooth. Preserve hole for hanger on the top tab by inserting a wooden skewer or dowel.
Beginning at corners, then front, back, and sides, cover remaining portions of carton with the 1” strips of plaster cloth. Fold ends over top and bottom of carton and smooth. Place the strips side by side, then add an additional layer to cover the seam between first layers. Apply remaining 4” square of plaster cloth to bottom. Smooth.
Suspend carton from wooden skewer between two old boxes until completely dry.
4. With medium paintbrush, paint top of roof with raw umber. Paint sides and bottom with blue bonnet. Let dry.
5. Decorate. Try decorating techniques on scrap paper before applying them directly onto your birdhouse.
Trees and shrubs. Measure 1 ½” from one end of a chenille stem and bend back toward the main stem. Twist 2-3 times to secure end around the main stem, then form the looped end into a small leaf shape. Bend leaf shape at a 90-degree angle to resemble a foot and leg. Squeeze a small puddle of crisp green paint onto paper plate. Dip the leaf shape into paint then pounce excess off onto another area of plate before pouncing onto milk carton. Repeat until you get the tree or shrub shape you want. Add a small puddle of burnt umber paint to your paper plate. Dip one side edge of leaf shape into burnt umber, the other side in crisp green, pounce on plate to remove excess, then pounce inside tree or shrub shape to resemble branches. (See Fig. 1). Let dry.
Vines. Pinch one end of a paper straw together, then release to reveal a small leaf shape. Dip end into crisp green paint and pounce onto carton. (See Fig. 2). Leaves seem hollow at first, but fill in at center more as you work and as paint is absorbed the paper straw end.
Grass. Dip tip of toothpick into crisp green to paint grass, and flower leaves or stems around bottom of carton. You can get a different look by stroking upward for grass, and downward for flower leaves. Let dry.
Berries and flowers. Dip sharp end of a new toothpick into a puddle of bright red paint and tap onto vines and shrubs to resemble berries (See Fig 2). For flowers, dip wooden end of a small paintbrush into paint, then press onto carton in a circular pattern (See Fig. 3). Fairies LOVE berries and flowers!
Tree trunk. Glue a flat piece of tree branch at center of tree leaves as shown.
6. Roof. On a covered work surface, break the branching seed pods off of 1-2 medium size pine cones (some adult assistance may be needed). Use scissors or wire cutters to trim any frayed ends. Beginning at bottom of roof and working upward, glue narrowest end of seed pod to roof in rows. Let dry.
7. Finishing touches. Refer to photo to glue two small pine cones at front peak of roof. Glue popcorn where pine cones meet and Spanish moss inside each hole on carton front. Let dry completely before moving. For indoor use only.
|