|
Age Range: 7 to 12
Grade Range: 2 to 6
Skill Level: Advanced
Appropriate for These Special Events:
Every Day, Home Dec, Gift Giving and Rainy Days
Supports Subject Areas of:
Social Studies
Language Arts – e.g. step by step instructions
Mathematics - measuring
Visual Arts
Time needed for project:
1 to 1 ½ hours

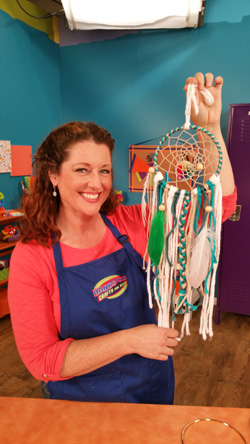
Dream Catcher
Materials:
Pepperell® Braiding Company:
- EZ Beader™ tool
- One 6 inch metal ring
- One 5 yard strand 2mm Stone Amy Cord
- Eight 1 yard lengths of White Roving Craft Yarn
- One 3 yard strand of 4mm Pearl Bonnie Braid
- One 3 yard strand of 4mm Denim Bonnie Braid
- One 3 yard strand of 4mm Turquoise Bonnie Braid
Elmer’s® CraftBond® Tacky glue
Three feathers
Four 12mm wooden beads
Permanent Marker
Tape
Scissors
Clipboard
Directions:
1. In permanent marker, write your dreams and wishes on the wooden beads, then set them aside.
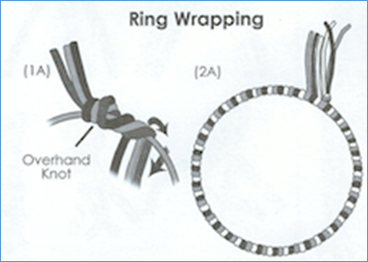
2. Holding the 3 strands of 4mm Bonnie Braid cord together, tie the ring with a temporary knot, leaving an 18 inch tail (Figure 1A).
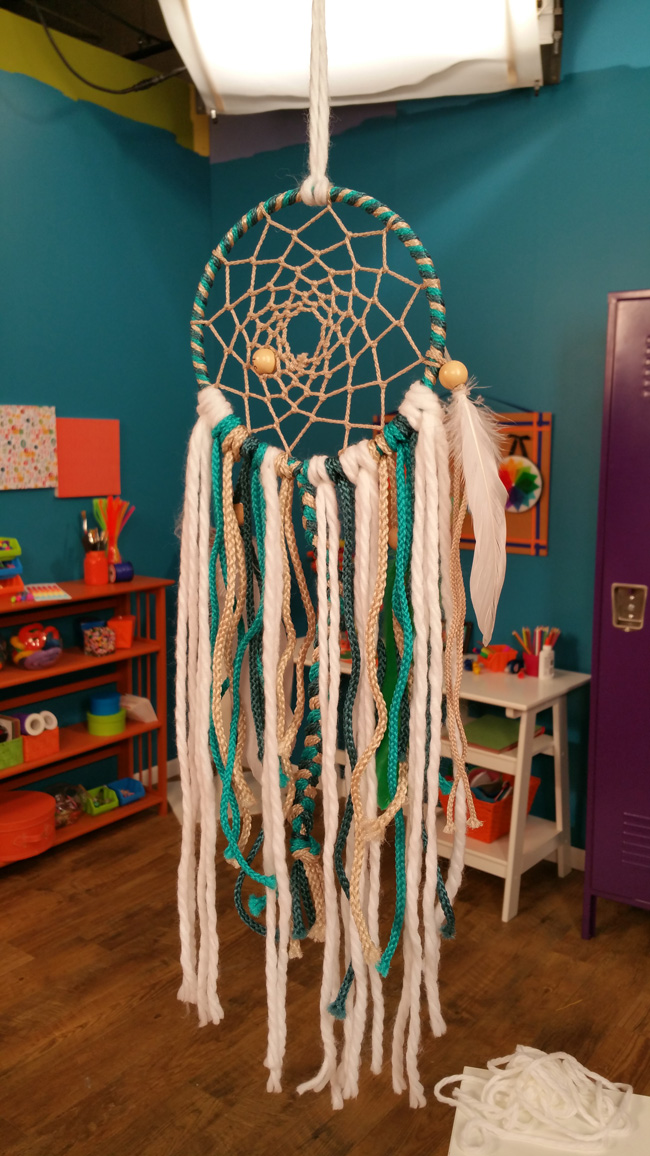
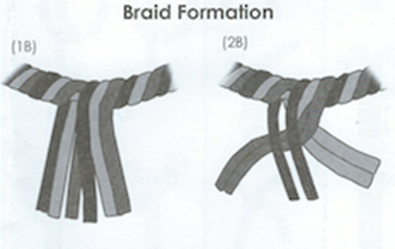
3. Wrap the ring while holding the 3 strands together. Try to keep the cords flat; don’t let them twist or overlap (figure 1A-2A). Continue until entire ring is wrapped. With ring fully wrapped and with all lose ends of cord at bottom, clip top of ring into a clipboard to hold in place. Untie the Overhand Knot and match the cords together by color (figure 1B). Three-strand Braid a 10-12 inch tail (figure 2B). Tie off with an Overhand Knot, trim the excess and set any long pieces aside for decorating later.
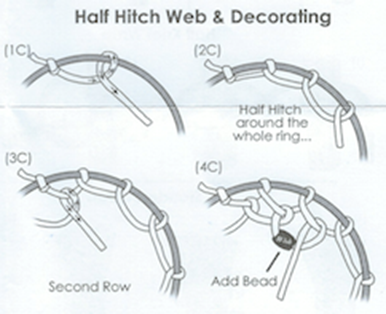
3. Webbing. To prevent raveling and preserve cord end for easier weaving, apply tape to one end of the 2mm cord before you start. Tie one end of the 2mm cord to the covered ring (figure 1C). Form a web on the interior of the ring by following (figures 2C-3C). On the third web layer, add a wish bead to the strand (figure 4C) and continue web. EZ Beader™ Tool from Pepperell is helpful when trying to pull cord through small holes at center of web as it nears completion. To finish web, tie a knot near the center, add a small drop of glue to knot to secure, then trim excess cord (figure 5C).
4. Decorate. Tie excess strands to the catcher and thread the remaining beads here and there. Strands of cord can be attached to the ring using the Lark’s Head Knot (figure 6C). Cut the white roving yarn into 1 yard (36”) lengths, set one length aside, and distribute remaining lengths around the base of the ring. Braid some ends together and string on any remaining beads for added interest. Feathers can be tucked into beads and secured with glue. Use EZ Beader™ tool to pull cord through wooden beads.
5. Hanger. Use the last 36” length of roving yard to create hanger. Attach to top of ring using Lark’s Head Knot, tying an Overhand Over hand knot at top to finish ends.
Figures (as taken from Pepperell’s Dream Catcher Kit instructions):

|