| |
 |
|
|
|
|
 |
|
|
| |
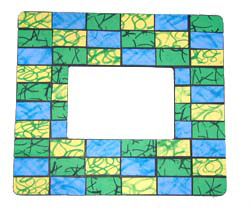
Mosaic Frame
By Sandy Laipply
1002-1
 When
you see the “helping hand” symbol on a project, it means
you may need adult supervision to do the project. Always use care
when using tools or a heat source. Be careful and safe! When
you see the “helping hand” symbol on a project, it means
you may need adult supervision to do the project. Always use care
when using tools or a heat source. Be careful and safe!
|

|
Main supplies:
- Walnut Hollow®
Wooden Frame 12.5” X 11” with a 5” x 7”
opening
or Elmer’s® Foam Board
- Green, yellow,
and blue cardstock – ½ sheet each
- Elmer’s®
Paintastics™ Paint Brush Pens – blue, green and black
- Elmer’s®
Glue-All®
- DecoArt®
Black Acrylic Paint
Basic Supplies:
- Sponge brush
- Fiskars®
scissors or paper trimmer
- Cutting
mat and X-Acto® craft knife if using foam board
- Ruler
- Pencil
|
Instructions:
- If using a wooden
frame, paint it black. If using a foam board frame, have
an adult cut it to the correct size.
- Decorate cardstock.
Using the blue pen, make criss–cross strokes on lighter
blue cardstock.
- Using black
pen, put your initial in all directions on green cardstock.
Using the green pen, scribble on the yellow cardstock.
- Measure, mark,
and cut the decorated cardstock into 1” X 2”
rectangles
- Lay rectangles
on the frame in a pleasing pattern.
- One at a time,
glue the rectangles in place.
Sponsored By:
|
| |
|
|
Home
| Television | Projects
| Book Order | Helping
Kids | Teachers | Philosophy
E-mail questions about Hands On Crafts for Kids to info@craftsforkids.com
© Copyright 2004 Katherine Stull, Inc.
|


