Beaded Projects
By Tracia and Sydney Williams
1006-5 A, B & C
 When
you see the “helping hand” symbol on a project, it means
you may need adult supervision to do the project. Always use care
when using tools or a heat source. Be careful and safe! When
you see the “helping hand” symbol on a project, it means
you may need adult supervision to do the project. Always use care
when using tools or a heat source. Be careful and safe!
|
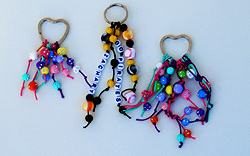
Back Pack Tags:
1006-5a
Main supplies:
- Bead
Party™- Bling Bling bead mix
Key ring
- Bead
Party™- braiding cords
- Bead
Party™- sports beads
- Bead
Party™- wood beads
Basic Supplies:
|
Back Pack Tag Instructions:
1. Fold cords
in half.
2. Put loops through key ring and ends of cords through loop.
3. Tie knot near loop.
4. Add beads, knots, and braids.
|
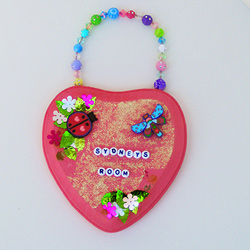
Heart Plaque:
1006-5b
Main supplies:
- BeWood
heart plaque
- Assorted
Spangles (leaves, flowers)
- Acrylic
paint and sparkly glitter glue
- Bead
Party™- Clay bead charms, bling bling bead mix, rainbow
burst beads
- Bead
Party™- braiding cord and alphabet beads
Basic Supplies:
- Foam
brush
- Glue
- Needle
nose pliers
- Have
adult drill holes on top of heart
|
Heart Plaque Instructions:
1. Paint heart
and spread a layer of glitter glue
2. Pull loops out of charms with pliers
3. Glue on spangles, charms, and alphabet beads
4. Cut cord to desired length, tie a knot on one end and string
beads
5. Tie knot on finished cord, add glue to predrilled holes and push
knots in. Let dry.
|
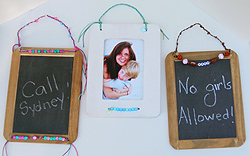
Beading on a chalkboard
or frame:
1006-5c
Main supplies:
- Bead
Party™- cotton braiding cords
- Bead
Party™- alphabet beads, sports beads, and wood beads
- Chalkboard
or frame (wood)
- Acrylic
paint for frame
Basic Supplies:
- Have
adult pre-drill holes in desired location
- Scissors
- Foam
brush for frame
|
Beading on a chalkboard
or frame Instructions:
1. Paint frame
2. Tie knot at end of cord and cut to desired length
3. Thread cord through one of the holes and add beads. Thread end
cord through other hole and secure.
Bead Party
by Sulyn Industries:
|


