| |
 |
|
|
|
|
 |
|
|
| |
Makin’s®
Clay Basics
By Gail Ritchey
1010-4
|
|
Main supplies:
- Makin’s
Clay®
Blue
clay
Pink
clay
Green clay
Brown clay
- Roller
- 3
piece tool set
- Texture
sheets
- Push
molds
- Cutters
– mini geo
- Makin’s
Professional™ Ultimate Clay Machine™
- Makin’s
Professional™ Ultimate Clay Extruder™
Basic Supplies:
- Mint
tins
- Table
surface
- Paint
brushes
- Cup
with water
- Cutting
mat
- Perfect
Pearls powders
- Spray
bottle
- Plastic
Bags
- Plastic
Wrap
- Paper
Towels
|
|
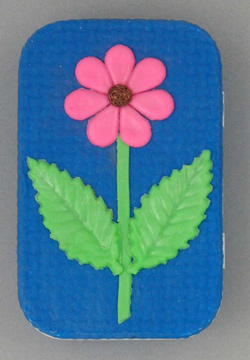
Instructions:
Note: See basic information
on working with Makin’s Clay®.
- Remove mints from
tin and place in a plastic bag.
- Open package of blue
clay by cutting open the outside package leaving the inside
plastic on the clay. Cut off desired amount through the
inside plastic with scissors. Remove plastic off clay.
- Place the clay on
a cutting mat then roll clay with green roller. Lift up
and continue rolling until the clay is approximately 1/16”
thick.
- Optional: Roll clay
with Makin’s Professional™ Ultimate Clay Machine™
to the #5 setting.
- Put blue clay on
the tin bottom, gently shaping the clay to the mint tin.
- Using the chisel
tool, start trimming the excess clay along the top of the
tin. Remove excess clay. Press the clay firmly to the tin
where the tin bottom meets the top using the chisel tool.
- Texture the clay
on the bottom and side using the Makin’s Clay texture
sheet. Allow the clay on the tin to dry slightly.
- Cover the top of
the mint tin following the above instructions.
- Cutting off about
one inch, open green clay.
- Put the green clay
in the extruder using the #2 disc.
- Extrude approximately
3 inches of clay for the stem by turning the handle on the
extruder.
- Brush the tin with
water where the stem will be. Place the stem centered on
tin. If necessary, the stem can be glued with a white craft
glue.
- Remove the excess
clay from the extruder. Powder the leaf mold the push the
green clay into the mold. Push off excess clay with your
finger or the chisel tool. Remove the leaf from the push
mold. If the leaf is difficult to remove, allow the clay
to dry in the mold for several minutes.
- Repeat the above
for a second leaf.
- Put leaves on tin
using water or glue.
- Remove approximately
one inch of neon pink clay following above instructions.
Roll the pink clay to approximately 1/16” thickness.
- Place the clay on
the cutting mat, then cover with a piece of plastic wrap.
Cut 5 petals.
- Place the petals
on the tin following the photo for reference.
- Use a tiny amount
of yellow clay to form the center of the flower.
- Accent the flower
with powder if desired.
Sponsored By:
|
| |
|
|
|
Home
| Television | Projects
| Book Order | Helping
Kids | Teachers | Philosophy
E-mail questions about Hands On Crafts for Kids to info@craftsforkids.com
© Copyright 2004 Katherine Stull, Inc.
|