1. On one full piece of Watercolor paper, paint the top of the paper with a wash of blue metallic paint and the bottom of the paper with green metallic paint. Try to blend the two colors in the middle and keep the project wet so that the colors blend easily. Add more paint as needed so that the very top of the page is the darkest blue and the very bottom is the darkest green.
2. While the base page is still wet, take a piece of plastic wrap and lay it on top of the project. Crumple up the plastic wrap and make it bunch all over the base page. Once the plastic wrap is in place, leave it in place and allow the page to dry completely without lifting the plastic. Once the page is completely dry you can then lift the plastic to reveal a beautiful marble effect on your base page. Notice how the metallic paints glitter in the light!
3. Take 2 smaller pieces of watercolor paper and paint them in the same manner as above, using pink/red on piece and orange/yellow on the other. Apply the plastic wrap in the same manner as above and set aside to dry.
4. On another piece of white craft paper, draw out the letters of your name in big chunky letters. Make sure that the whole name will fit onto your base sheet when it is done. Cut each letter out.
5. Rip tiny pieces of the two four inch squares and cover the letters of your name with the little scraps. Don't worry about staying on the letter shape perfectly. Just cover every little bit and overlap the two colors to create a fun collage.
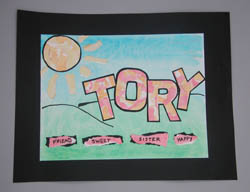
6. Turn your letters over so that you can see your original cut shape and trim the collage paper so that you have a nice straight edged letter again. Glue each letter onto black craft paper and trim out around it. Repeat this same collage technique to make a sun and rays for your page.
7. Use a black marker to draw a 'hill' to separate the sky from the land on the base page.
8. Adhere the letters and sun onto the base page. Tear additional scraps of colored paper to write descriptive words about your self on and glue them in place along the bottom of your project.
9. Your desk blotter/protector is ready to be put into place. If desired tape over the top with packaging tape to provide a clear protective cover or laminate your personalized blotter.