
Sewing Machine
T-Shirt to recycle
1 yard Fusible Tricot Interfacing
4 Yards Cording
Rotary Cutter, Mat and Ruler
Large Eyelet Kit by Dritz

1. Lay your T-Shirt flat on your rotary
cutting mat. Cut through both layers of the
shirt. Place the ruler underneath the neckline of
the shirt, and cut across the top of the shirt.
Using scissors, cut down next to the sleeves and
cut off the sleeves.
2. Using your rotary cutter and ruler, cut 2” off the
bottom, measuring up from the bottom hem.
This hem is going to become the casing for the
top of your bag.

3. On the remaining shirt, cut to an 18” square if possible
(depending on the size of your shirt) or the largest square
possible if you have a smaller shirt.
4. Iron fusible interfacing to the back of the two 18” squares.
The interfacing stretches one way, and the shirt stretches one
way. Place the interfacing so that the stretch is the opposite
way from the stretch in the shirt.

5. Cut the 2” hem strips into two pieces 17” (0r 1”
shorter than the width of your square). Trim the
strips about 1/4” from the hem edge as shown.
6. Place the hem pieces right sides together with
the t-shirt squares. The hem pieces need to
be on the top edge. Pin away from the raw
edge. Because we are going to sew the
pieces, you need to be especially careful to
remove the pins before you get to them. The
hem strip should start and end 1/2” from the
ends. This way it won’t be caught in the side
seams.
7. Sew the hem strips to the top of each of the t-shirt
pieces.
8. Sew the sides and bottom. Be careful not to catch
the hem strips in the side seams.
9. Turn right side out, and insert the “Eyelets”
following the package instructions in the two lower
corners.
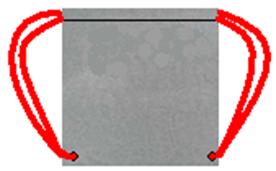
10.Cut the cord in half. Insert the end of one cord
into one of the eyelets, and tie a knot. Thread one
of the ends into the front hem/casing and around
through the other side into the back hem/casing.
Bring it back down into the same hole as the
first end and knot off. If you have trouble getting
the ends through the hole, wrap tape around the
end. Repeat, starting at the eyelet on the other side.
Try on your back bag, and adjust the cord as needed,
cutting off the excess.
Fill your bag, and you are ready to go!

|