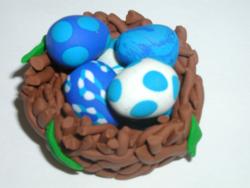
NEST
1. Roll a ball of brown Fimo® out so that it is approximately 2” x 2” and then use a paper tube or small circle to cut it. Form the Fimo® into a shallow cup.
2. Roll small lengths of brown Fimo® into 1/8” tubes and cut 1” long pieces. Stack these ‘twigs’ around the shallow cup to form a nest. Use lots of twigs and criss cross them every which way to make a woven looking nest.
3. Flatten a small ball of green Fimo® and cut 3 to 4 leaf shapes out of it. Indent the center of each leaf and then tuck them into the woven twigs of the nest.
EGGS
4. Marbled Egg: Roll a ¼” ball of blue and a ¼”” ball of white Fimo® into small long sausage shapes and then twist the two sausages together like a candy cane. Continue twisting until the desired marble pattern is achieved. The more you twist, the more blended the marble pattern will be. Once complete, roll the marbled Fimo® into a ball, flatten out one end and make an egg shape.
5. Spotted Egg: Roll a ½” ball of white Fimo® and form it into an egg shape. Roll tiny 1/16” balls of blue Fimo® and flatten them out. Push each dot onto the white egg shape.
6. Cane Egg: Roll a 1/16” strip of blue Fimo® and cut a 2” length. Roll a long strip of 1/32” light blue Fimo® and cut into four 2” lengths. Flatten a piece of white Fimo® to be the same 2” length and cut into four 1/16” widths. Using the largest blue strip as the center, stack the white and light blue strips of Fimo® around the center, alternating colors. Wrap this coil of colors in a flattened piece of blue Fimo® and then roll out this ‘cane’ to smooth out the edges. Cut 1/16” wedges of the finished cane and stack on top of a blue ball. Roll the ball to smooth edges then form into an egg shape.
7. Place nest and eggs on a tile, piece of glass or foil and bake in the oven following the manufacturer’s instructions.
 |
|
|


