| |
 |
|
|
|
|
 |
|
|
| |
94
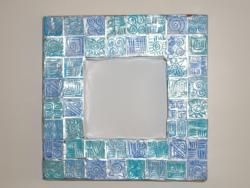
Metal work is an important craft in rural and small towns in India. The metal is etched, into intricate designs with different cities known for various design styles.
 |
When
you see the “helping hand” symbol on a project, it means
you may need adult supervision to do the project. Always cover your work surface with a mat or some type of protective covering like wax paper or plastic. Always use care when using tools or a heat source. Be careful and safe! |
Always cover your work surface with a mat or some type of protective covering like wax paper or plastic
Age Range: 7 to 12
Grade Range: 1 to 6
Skill Level: Moderate
Appropriate for These Special Events:
Every Day and Rainy Days
Supports Subject Area(s) of:
Social Studies
Language Arts – e.g. step by step instructions
Visual Arts
Math – e.g. measuring
Time Needed for Project:
1 hour plus drying time
 |
This project features notes or instructions in Adobe Reader format. If you
do not have Adobe Reader, download it for free here. |
|
 |
- STYROFOAM™ Brand Foam sheet – 1” wide
- Elmer’s® Craft Bond™ Tacky Glue
- Heavy duty foil
- Poster board
- Acrylic paint – dark and medium blue, turquoise – or desired colors
- Insert image of tacky glue to side of Main Supplies list

- Pencil
- Ruler
- Scissors
- Paper towels
- Waxed paper
- Magazine
- Serrated plastic knife
|
- Measure and cut an 8” square from foam sheet then cut out a 4” square from center.
- Measure and cut a 1” x 12” strip of poster board. Tear off a 3” wide or so strip of foil. Place, shiny side down, on work surface. Place post board strip down center then use a pencil to trace along both side to score foil. Remove strip. Carefully fold foil along score lines. Fold and cut strip into fourths. Bend each section in half. Apply glue to inside corners of frame then press foil pieces into place pressing to secure – this will cover insides corners when frame is covered.
- Place a piece of foil, larger than frame, shiny side up, on surface, then place frame in center. Fold in foil on sides then fold to back and glue ends in place. Repeat step along all sides to cover frame. Use scissors to carefully cut an “X” in center. Fold and glue ends to back of frame.
- Tear about six 3” wide strips of foil. Place one, shiny side up, on magazine – the magazine allows pencil to create a deeper score line than a hard work surface. Center poster board strip then score along each side with pencil. Fold along score lines. Repeat with other strips. To create designs on strips, place one on magazine. Use pencil and poster board strips to mark off 1” along foil strip. Use dull pencil to create design on each section. Repeat step with all strips. Cover work surface with waxed paper. Squeeze a small puddle of acrylic paint onto foil square. Crumple paper towel then dip into paint. To antique designs, pounce paint onto strip making sure paint is within indented designs then use same paper towel to lightly wipe off excess paint leaving an antiqued look. Repeat step with remaining strips changing color of paint for every two strips. Let dry then cut apart 1” sections along strip.
- Position squares on front of frame as shown intermixing colors. Add a dot of glue to back of each square then press into place. Let dry. To create backing use pencil to lightly trace around frame onto poster board. Cut about ¼’ smaller on all sides. Glue in place on back of frame.
|
Travel around the world and experience the culture, arts and traditions that make the world unique. Visit Peru, Italy, Canada, USA, Australia, Japan, China, Russia, India, Mexico, Ghana, Egypt, and Scotland.
Click here to order now!
|
|
| |
|
|
Home
| Television | Projects
| Book Order | Helping
Kids | Teachers | Philosophy
E-mail questions about Hands On Crafts for Kids to info@craftsforkids.com
© Copyright 2010 Katherine Stull, Inc. |


