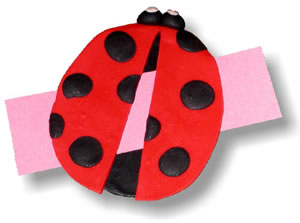
Instructions:
BEFORE STARTING: Knead clay until
soft to make it easy to work with. Cover working surfaces
with wax paper, then clean surfaces and wash your hands thoroughly
after kneading.
1. Use the roller to
roll out thin sheets of red and black clay on wax paper.
2. Cut an oval shape from scrap paper to use as a pattern.
Use the pattern to cut an oval from the black and red sheets
of clay.
3. Cut the red oval in half to create the ladybug’s
wings. Pinch off small bits of black scrap clay, roll them
into tiny balls and press them flat to make circles. Press
the black circles onto to the red wings.
4. Put a piece of scrap paper across the black oval, leaving
part of the top edge uncovered. Press the “wings”
in place on top of the black clay. The paper will keep the
wings from sticking to the body except at the top where the
body is not covered with paper. Press two small balls of black
at the top of the body for “eyes”, then add a
tiny ball of white to each eye.
5. Leave the paper between the body and wings. Bake the lady
bug on an oven proof glass surface in a 275ºF oven for
15 minute per ¼” thickness, with good ventilation.
DO NOT USE A MICROWAVE OVEN. Avoid over baking. After the
bookmark is cool, carefully remove the paper from between
the body and wings.
To use the bookmark- Slip the page to be marked between the
wings and body of the ladybug, so that the eyes peek out the
top of the book!
|


