| |
 |
|
|
|
|
 |
|
|
| |

By Mary Ayres
|
 |
Main supplies:
- 4”
Styrofoam® ball
- Forster®
Woodsies™ ½” teardrop and craft spoon
- Pacon®
pony beads – approximately 39 yellow
- Pacon®
chenille stem – black and two 7mm wiggly eyes
- Delta Ceramcoat®
acrylic paint – light green, orange, purple
Basics supplies:
- Fine tip black marker
- Glue
- Paint brushes
- Plastic knife
|
 When you see the “helping hand” symbol on a project,
it means you may need adult supervision to do the project. Always
use care when using tools or a heat source. Be careful and safe!
 |
Instructions:
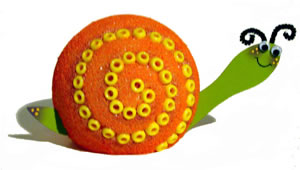
1. Slice off ½”
from ball with a plastic knife.
2. Dry brush ball with orange paint. Let dry. Using purple
paint, dry brush a large swirl on ball beginning at bottom
edge of ball.
3. Put a dab of glue on the bottom of each pony bead and press
into Styrofoam® around swirl, beginning at the bottom
of the swirl.
4. Paint the craft stick and teardrop green. Let dry. Using
purple paint, dry brush cheeks for the snails face and the
tip of the tail (teardrop). Draw mouth with a black marker.
Glue wiggly eyes in place. Let dry.
5. Press small end of craft spoon head into bottom ride side
of snail body. Press rounded end of teardrop tail in bottom
of left side of body. Cut chenille stem in half. Using only
half, bend stem to form antennae and glue in place.
|
| |
|
|
Home
| Television | Projects
| Book Order | Helping
Kids | Teachers | Philosophy
E-mail questions about Hands On Crafts for Kids to info@craftsforkids.com
© Copyright 2004 Katherine Stull, Inc.
|


