Instructions:
BEFORE STARTING:
Knead clay until soft to make it easy to work with. Cover
work surfaces with wax paper, then clean surfaces and wash
your hands thoroughly after handling clay.
What is a cane? A cane is a long section of clay that has
a design or pattern built into it so that every slice taken
from the clay log is the same. Think about those refrigerator
cookies that you can get for holidays – the ones where
you slice the log of dough and every cookie has the same design.
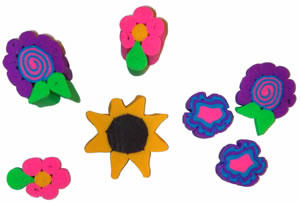
1. Choose a color of clay for the center of the flower. Roll
the clay on your work surface to make a “log”
about 2” long. Stand the log on one small end on your
work surface.
2. Roll smaller logs (or “snakes”) from another
color of clay for the petals. Press these in place around
the flower center – use a few bigger ones or lots of
smaller ones. You may want to pinch one end into a point to
make different petal shapes.
3. Add green clay snakes for leaves if desired – just
make sure that every part you add to the flower is pressed
into position really well.
4. Bake the flower cane standing on end on an oven proof glass
surface in a 250ºF oven for 10 minutes with good ventilation.
DO NOT USE A MICROWAVE OVEN. Avoid over baking. Allow to cool
completely.
5. Slice each cane into individual flowers. Trade them around
so that everyone has an assortment of flower erasers to remember
the party by!
|