| |
 |
|
|
|
|
 |
|
|
| |

By Alice Disney Huelskamp
for Delta Technical Coatings, Inc.
|
 |
Main supplies:
- Delta Ceramcoat®
acrylic paint – white, pumpkin, fuchsia
- Delta Ceramcoat®
Exterior/Interior Varnish and Delta Ceramcoat® Gesso
- Delta Stencil
Mania™ Poster Alphabet
- Paper maché
box with lid
- Ribbon or
cording – orange, fuchsia, white
Basics supplies:
- Delta Stamp &
Stencil sponges
- Paint brush –
½” flat, liner
- Re-positional note
pad
- Pencil
- Ruler
- Scissors
|
 When you see the “helping
hand” symbol on a project, it means you may need adult
supervision to do the project. Always use care when using tools
or a heat source. Be careful and safe!
When you see the “helping
hand” symbol on a project, it means you may need adult
supervision to do the project. Always use care when using tools
or a heat source. Be careful and safe! |
Instructions:
1. If the box has writing
on it or dark colors, apply gesso to the box. Let dry. Apply
a second coat as needed.
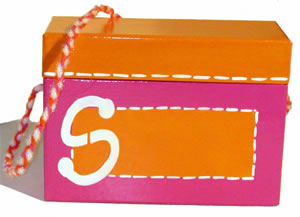
2. Using the flat brush paint the lid of the box pumpkin (orange).
Apply a second coat as needed. Let dry thoroughly.
3. Mark off a 1” border on the front of the box with
pencil and ruler. Use the re-positional notes to mask off
the center to be painted pumpkin. Dip a sponge into pumpkin
paint (pat off excess) and using an up and down pouncing motion
paint the center. Let dry. Carefully remove re-positional
notes.
4. Use the re-positional notes to cover the edges of the pumpkin
colored center. Paint the remainder of the box fuchsia. Let
dry.
5. Poke a hole in each side of the box for the strap. Braid
the orange, fuchsia, and white ribbon or cording for the strap.
Thread the strap in each hole and tie a knot on the inside
of the box to secure.
Optional:
1. Position the letter stencil referring to the photo for
placement. Secure with a re-positional note. Dip a sponge
in white paint (pat off excess) and using an up and down pouncing
motion stencil the letter. Apply several light coats instead
of one heavy application to help prevent seepage under the
stencil. Carefully remove the stencil.
2. Use the liner brush and white paint to make the stitch
lines around the pumpkin colored center and the bottom of
the lid referring to the photo for placement. Let dry.
3. Apply 2 coats of varnish to all painted surfaces allowing
it to dry between coats. Let dry. |
| |
|
|
Home
| Television | Projects
| Book Order | Helping
Kids | Teachers | Philosophy
E-mail questions about Hands On Crafts for Kids to info@craftsforkids.com
© Copyright 2004 Katherine Stull, Inc.
|


