| |
 |
|
|
|
|
 |
|
|
| |

By Prudy Vannier

Japan
|
| The
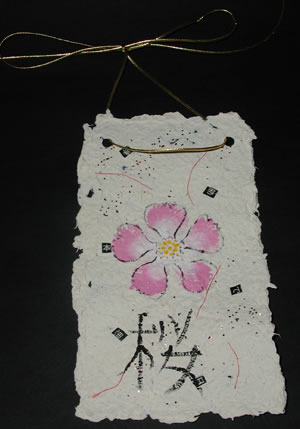
cherry blossom is loved by the Japanese people and is even used sometimes
to symbolize Japan. Wall hangings are used often in homes and schools
to celebrate seasons or occasions. This wall hanging not only has
a cherry blossom painted on it, but the Japanese word below is the
writing for “cherry blossom”. Painting
lesson: easy doubleloaded brush stroke petals, brush tip dots, line
work with a round
|
 When you see the “helping hand” symbol on a project,
it means you may need adult supervision to do the project. Always
use care when using tools or a heat source. Be careful and safe!
|
 |
Main supplies:
- DecoArt®
Paper Perfect™ Natural PP40
- Paper Perfect™
Accents Red Natural Fibers PPF07
- Paper Perfect™
Accents Celestial White Glitter PPF01
- Royal®
Palette knife
- Sheet protector
- Japanese
alphabet (from internet translations sites)
- Fiskars®
Scissors
- 20”
gold cord
- Fiskars®
Paper punch
- DecoArt®
Americana Acrylic Paint: Boysenberry Pink DA29, Titanium White
DA001, Marigold DA194, Ebony Black DA067
- Royal®
Brushes: ¾” flat, #4 rounds
- Painting
supplies: Royal® water basin, graphite paper, tracing paper,
paper towel, Royal® palette paper, Royal® stylus, pencil
|
Instructions:
1. Following the directions on the back of
the Paper Perfect jar, spread the liquid paper onto a sheet
protector with a palette knife. Spread it thin and shape into
a rectangle approximately 4” X 8”.
2. While wet, sprinkle a small amount of glitter and a few
red threads to decorate. Print a Japanese alphabet from the
internet and cut some out to place into the wet paper to decorate.
Dry for 12 to 24 hours before peeling off the sheet protector.
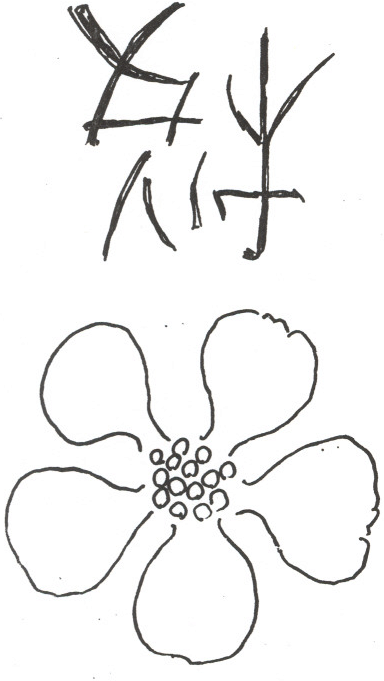
3. Lightly pencil or transfer the patterns by tracing them
onto tracing paper. Position the design, then slide graphite
paper under it. Hold in place while you go over the lines
with a stylus.
4. Using the ¾” flat, load Titanium White on
one side and Boysenberry Pink on the other. This is called
doubleloading. Palette blend slightly then paint a petal with
the white toward the center. Repeat for all petals.
5. The center is Marigold brush tip dots. Use the handle of
the brush to dip into Marigold than place in the center to
make a dot. Repeat the process until the center has lots of
dots with none of them overlapping.
6. Use slightly thinned Black and the round brush to paint
the letter and to outline the petals.
7. Punch holes in the top and run gold cord through them to
hang.

|
| |
|
|
Home
| Television | Projects
| Book Order | Helping
Kids | Teachers | Philosophy
E-mail questions about Hands On Crafts for Kids to info@craftsforkids.com
© Copyright 2004 Katherine Stull, Inc.
|


