| |
 |
|
|
|
|
 |
|
|
| |

by Dimples Mucherino
|
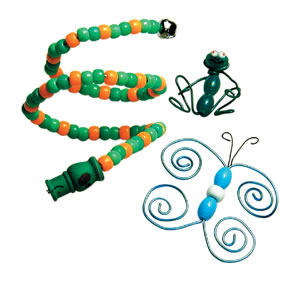 |
Caterpillar
Bracelet
You will need:
- 36" Piece 18 gauge
wire - light yellow
- Pony beads - 24 green, 24
lime and 24 orange
- 5/8" x 5/8" Wood
candle cup
- 1/2" x 1/2" Wood
spool
- Gold jingle bell - 1/2"
diameter
- Acrylic paint - green
- Glue
- Permanent markers - black,
white & red
- Nail clippers or wire cutters
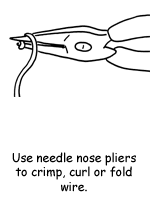
- Needle nose pliers
- Paintbrush
|
Instructions:
1. Paint candle cup and wood spool green.
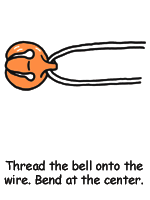
2. Fold 36" wire in half aligning both ends. String
jingle bell on one end of wire. Hold ends of wire up so the
bell rests in fold.
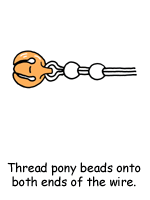
3. String pony beads on both wires alternating colors in
the following order: green, lime green and orange.
|
I
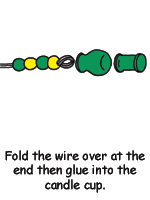
4. Bend ends of wire back in small loop. Cut off excess if
necessary. Wedge and glue loops inside top of candle cup.
Glue wood spool centered on bottom of candle cup.
5. Use marker to draw face. Draw eyes, nostrils and mouth
with black. |
|
| Toner
Plastic, Inc™ Fun Wire™, CraftLace™ ; Darice®
Wiggle Eyes, Pony Beads, Wood Spool, Candle Cup, Jingle Bell, Pin
Back; Fiskars® Micro-Tip® Needle Nose Pliers; Delta Ceramcoat®
Acrylic Paint |
|
Butterfly Pin
You will need:
- Two 13 1/2" pieces
18 gauge wire - purple
- 4" piece 24 gauge
wire - black
- 1" pin back
- Pony beads - 2 purple
ovals
- 1 dark pink barrel
- Tacky glue
- Needle nose pliers
Instructions:
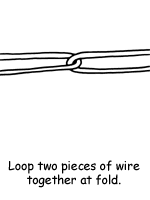
1. Fold each length of
purple wire in half. Loop together to form one long length.
Crimp together with needle nose pliers.
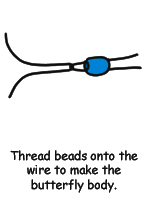
2. String barrel pony
bead on wire. Center over joint. String one oval pony bead
on each side of barrel pony bead. Spread wires to the sides
of the beads to hold beads in place.
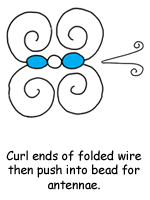
3. To make wings, twist
the end of each wire into small loop bending the front wires
towards the back and the back wires towards the front. Continue
twisting each wire into a spiral increasing the size of each
loop as you twist.
4. For the antennae,
fold the black wire in half. Wedge the folded end into the
hole in the front bead. Bend ends out and up to form a "V".
Twist each end of wire down into a small loop. Glue pin back
on bottom of body. Let dry.
|

|
|
|
Frog
You will need:
- 16 1/4" of 18 gauge
wire - green
- 3 Oval pony beads - green
- 1" Pin back
- Two 4mm red wiggle eyes
|
Frog
You will need:
- Tacky glue
- Needle nose pliers
- Nail clippers or wire cutters
- Black marker
|
Instructions:
1. Cut wire into one
11" long piece for the body and one 5 1/4" piece
for the arms.
2. Fold wire for body
in half aligning both ends.
3. String 1 pony beads
on for head and center on wire. Twist wires together a half
turn below head.
4. String 2 pony beads
onto both wires for the body. Push up to neck. Spread wires
apart. Shape legs by bending upward to form knees, then down
to form legs.
|
I
Twist one small loop
at each end of wire for feet then bend feet out to sides.
5. Center wire for arms across front of neck, bend ends back
and around neck, crossing to opposite sides. Twist one small
loop on each end of wire for hands. Bend arms down to knees.
6. Glue eyes on face. Draw mouth and nostrils with black
marker. Glue pin back on back of body or adjust legs so frog
will sit.
|
|
| Toner
Plastic, Inc™ Fun Wire™, CraftLace™ ; Darice®
Wiggle Eyes, Pony Beads, Wood Spool, Candle Cup, Jingle Bell, Pin
Back; Fiskars® Micro-Tip® Needle Nose Pliers; Delta Ceramcoat®
Acrylic Paint |
Home
| Television | Projects
| Book Order | Helping
Kids | Teachers | Philosophy
E-mail questions about Hands On Crafts for Kids to info@craftsforkids.com
© Copyright 2004 Katherine Stull, Inc.
|